안녕하세요 오늘은 안드로이드의 각종 레이아웃의 종류와 간단한 예시로 설명을 드리고자 합니다.
안드로이드에 내장된 기본 레이아웃의 종류가 매우 다양한데요
오늘 글을 보고 상황에 따라, 내가 사용하기 편한 레이아웃을 고르셔서 사용하시길 바랍니다.
Android Layout 종류
- LinearLayout
- RelativeLayout
- ConstraintLayout
- TableLayout
- GridLayout
- FrameLayout
- 기타 Layout
이러한 레이아웃들이 있습니다.
LinearLayout


<LinearLayout
    android:layout_width="match_parent"
    android:layout_height="match_parent"
    android:orientation="vertical" >
</LinearLayout>
LinearLayout은 가로 혹은 세로로 순차적으로 쌓아나가는 Layout으로 대표적으로 많이 사용하는 Layout입니다.
android: orientation의 상태에 따라 방향이 변경됩니다.
- vertical : 세로 방향
- horizontal : 가로 방향
RelativeLayout

<RelativeLayout
    android:layout_width="match_parent"
    android:layout_height="match_parent" >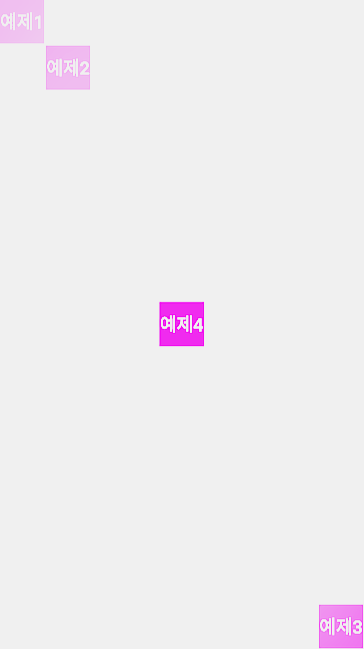
</RelativeLayout>RelativeLayout은 상대적으로 위치를 지정해주는 Layout으로 부모 뷰인 RelativeLayout을 기준으로 위치를 지정하거나 또 다른 자식 View의 위치를 기준으로 위치를 지정해 줄 수 있습니다.
ConstraintLayout
<androidx.constraintlayout.widget.ConstraintLayout
	android:layout_width="match_parent"
    android:layout_height="match_parent" >
</androidx.constraintlayout.widget.ConstraintLayout>
Constraint(제약) Layout입니다. RelativeLayout에 가중치를 추가하여 조금 더 발전된 Layout이라고 생각하면 될 것 같습니다.
자식 View들에 제약을 주어 부모View 기준으로 위치를 지정하거나 다른View를 기준으로 위치를 지정할 수 있고, 각 View의 크기를 유연하게 지정할 수 있는 Layout입니다.
구글이 권장하는 Layout으로 기본적으로 xml 생성시 적용되어 있습니다.
사용법은 다음 게시글에 설명드리도록 하겠습니다.
TableLayout
<TableLayout
    android:layout_width="match_parent"
    android:layout_height="match_parent"
    android:stretchColumns="0, 1">
    <TableRow>

    </TableRow>

    <TableRow>

    </TableRow>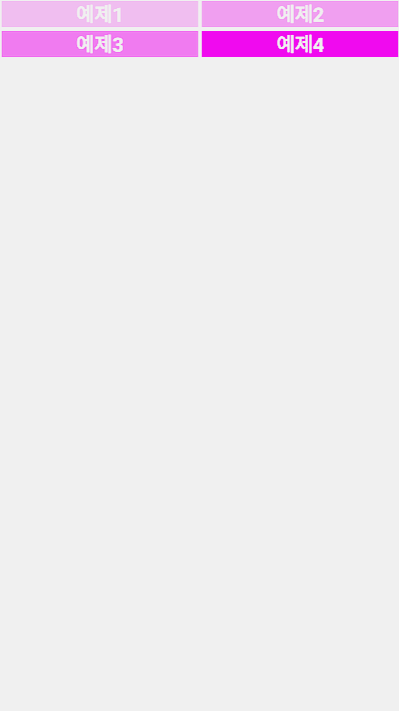
</TableLayout>TableLayout은 이름 그대로 View들을 표처럼 배치할 수 있는 레이아웃입니다.
<TableRow>는 TableLayout의 행(Row)가 돼고 TableRow안에 들어가는 뷰들의 수만큼의 열(Column)이 생기게 됩니다.
android:stretchColumns는 지정한 열의 넓이를 넓혀 빈 공간을 채우게 된다. 따로 지정하지않고 *를 넣으면 모든 열의 넓이를 동일하게 하고 빈 공간을 채워줍니다.
GridLayout


<GridLayout
    android:layout_width="match_parent"
    android:layout_height="match_parent"
    android:orientation="vertical"
    android:rowCount="3" >
</GridLayout>GridLayout은 TableLayout의 좀 더 발전된 형태로 TableLayout과 LinearLayout이 합쳐진 Layout입니다.
LinearLayout과 마찬가지로 android:orientation을 설정해 세로 배치 혹은 가로 배치를 설정해 줄 수 있습니다.
rowCount, columnCount를 지정하면 정해진 수 만큼 뷰가 채워진 뒤 다음 행/열로 넘어간 뒤 뷰가 채워지게 됩니다.
GridLayout은 주로 갤러리 등과 같이 동일한 크기로 뷰를 나타낼 때 사용됩니다.
FrameLayout

<FrameLayout
    android:layout_width="match_parent"
android:layout_height="match_parent" />FrameLayout은 한가지의 뷰를 보여줄 때 사용됩니다.
여러개의 뷰를 중첩시킬 수 있기 때문에 여러개의 뷰를 중첩한 후 android:visivility를 설정하여 한가지의 뷰만 visible처리를 하여 보여주는 방식으로 사용합니다.
하지만 ConstraintLayout을 이용하여 중첩 가능하기 때문에 저는 FrameLayout을 사용하지는 않습니다.
기타 Layout
- TabLayout

TabLayout은 Tab을 선택하여 화면 전환을 할 수 있도록 만든 Layout입니다. 주 메뉴 안에서 보조 메뉴를 선택할 때 주로 사용합니다.
- CoordinatorLayout with CollapsingToolbarLayout, AppBarLayout

3가지 Layout을 함께 적은 이유는 CoordinatorLayout을 사용하기 위해 함께 사용되어야 하는 Layout이기 때문입니다. CoordinatorLayout은 스크롤 시 화면을 차지하는 부분을 줄여 사용성을 개선하며, 디자인적으로도 도움이 되는 Layout으로서 많이 사용되는 Layout입니다.
- DrawerLayout

DrawerLayout은 말 그대로 화면의 끝에서 가운데로 드래그하여 나타내는 보조 Layout입니다. 하지만 최신 안드로이드에서는 제스처 효과때문에 드래그 기능은 막고 특정 버튼을 통해 띄울 수 있도록 사용하기를 권장하고 있습니다.
오늘 Android에서 제공하는 Layout의 종류와 함께 예시를 보여드렸습니다.
앞으로 하나씩 상세한 사용법을 게시하도록 하겠습니다!
기타 Layout을 제외한 나머지 Layout의 소스는 아래의 제 GitHub에 게시해 뒀습니다.
GitHub - won-droid/practice: 뷰 사용 예제
뷰 사용 예제. Contribute to won-droid/practice development by creating an account on GitHub.
github.com
안드로이드 레이아웃 - LinearLayout 사용법
안드로이드 레이아웃 - RelativeLayout 사용법
안드로이드 레이아웃 - ConstraintLayout 사용법
안드로이드 레이아웃 - TableLayout 사용법
안드로이드 레이아웃 - GridLayout 사용법
안드로이드 레이아웃 - FrameLayout 사용법
안드로이드에 관련한 궁금한 사항을 댓글이나 방명록에 작성해 주시면 답변드리겠습니다~!
'Android > Design' 카테고리의 다른 글
| [Android] 안드로이드 레이아웃 - ConstraintLayout(컨스트레인트 레이아웃) 사용 방법 (0) | 2022.06.15 |
|---|---|
| [Android] 안드로이드 레이아웃 - RelativeLayout(렐러티브 레이아웃) 사용 방법 (0) | 2022.06.13 |
| [Android] 안드로이드 레이아웃 - LinearLayout(리니어 레이아웃) 사용 방법 (0) | 2022.05.25 |
| [Android] TextView 사용하기 2 - 코드(Programmatically) (0) | 2022.05.18 |
| [Android] TextView 사용하기 1 - XML (0) | 2022.05.18 |